Installing the condenser water system is an extremely important detail, but it is not paid attention by many people. Therefore, it has caused a lot of inconvenience in daily life. To overcome the situation of water flowing out from the air conditioner, installing a condensate pipe system is the most optimal solution. Please follow the article of Company P69 to understand better!
Why is it necessary to install condensate water when installing an air conditioner?
In the process of gas cooling (in the indoor unit of the air conditioner), water vapor condenses and liquefies, so there must be a way to drain water from the indoor unit. Many people do not pay attention or even know about this problem, so when installing the air conditioner, they do not know where to drain the water – especially when the indoor unit is on the inner wall, without access to any drainage system or going out. the outside is very far away. Therefore, families should pay attention when installing air conditioners to install more air conditioner drainpipes.
The air conditioner drainpipe is an important part of the materials when installing the air conditioner, when the air conditioner is operating, especially in the winter when it runs hot in the afternoon, the average amount of wastewater in a day and night is from 6-12 liters depending on of each line and capacity of the air conditioner. The water flowing through the outlet pipe has a cold temperature of about 10-15 degrees Celsius, so it is necessary to have parts to guide the water to avoid leakage and escape to the floor and ceiling.
=> Please see more:
- Install wall mounted air conditioner unit
- Construction and installation of ceiling-mounted Cassette air conditioning unit
- Installing a ceiling mounted air conditioner unit with a duct connection
Instructions on how to install the condenser water system
Installing the condenser water pipe of the air conditioner includes the following procedures:
Install the indoor unit water drain hose
Step 1: Connect the supplied drain hose (plastic type) to the water outlet of the indoor unit.
- The drain hose supplied with the machine must be used.
- The flexible hose type will prevent undue stress from the discharge tank.
- Do not bend the drain hose horizontally to prevent excessive force from being applied to the faucet. Bending the drain hose can cause water leaks.
Step 2: Tighten the drain hose connection to the machine outlet with the drain hose belt.
- Do not use glue to attach the drain hose (accessory) to the outlet of the machine.
- Using glue will make it difficult to remove the drain hose from the machine during machine maintenance or the like.
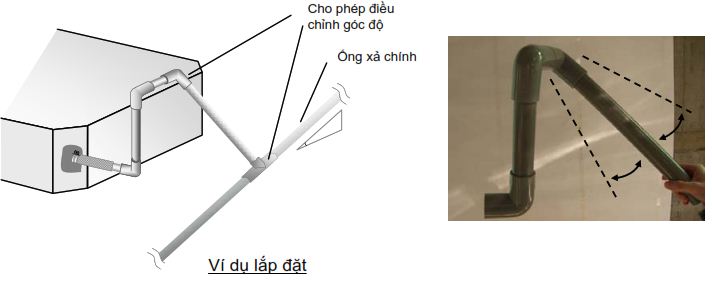
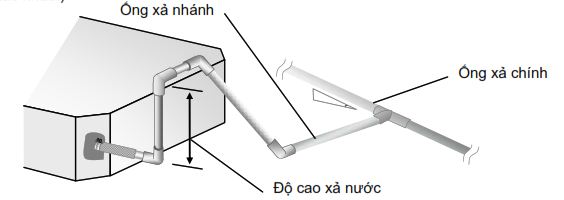
Step 3: Attach the branch drain to the main exhaust.
You can refer to the illustration below to connect from the indoor unit to the main exhaust pipe:

If the main drain is already installed and the slope required for the branch pipe cannot be guaranteed, you need to maximize the discharge height. (Check the flush height again in the installation manual as different models have different flush heights.)

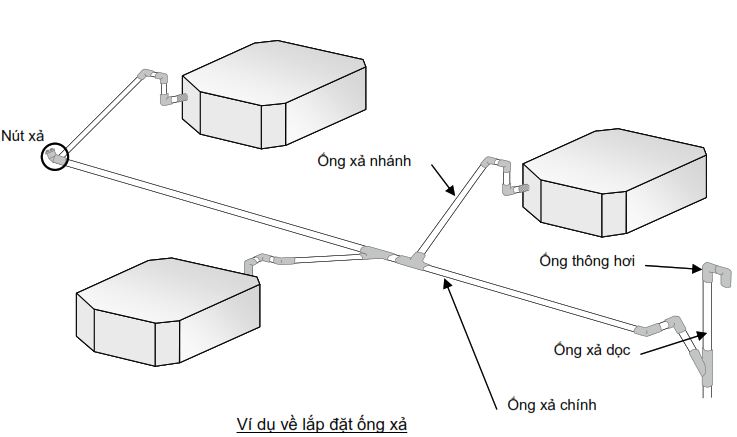
Install common drain hose
When connecting the main exhaust to a vertical exhaust, a Y- or T-joint can be used. However, using a Y-joint is the best way. If not locally available, a T-coupler can also be used.


**** Lessons Learned:
- Maximize the size of the main exhaust pipe within the allowable level.
- Attach the drain plug (cap) at the top of the main drain to check the water flow.
- Minimize the number of indoor units in each group to prevent the exhaust pipe being too long.
Check the water flow
Step 1: Conduct a water flow test before wrapping the hose.
Step 2: Use the drain plug at the top of the main drain to check the water flow.
**** Notes: In case of using polyvinyl pipes, use colored glue to help the installer not forget to reset the probe button.
Inner diameter of main and vertical exhaust pipes [Reference]
Calculate the discharge flow based on the number of indoor units connected to the main exhaust pipe. The inner diameter of the pipe can be calculated by the following method:
6 liters per hour for each HP is an approximation for the discharge rate of the indoor unit. For example, there are 3 machines with 2 HP and 2 machines with 3 HP:
6 L/h 2 HP 3 machines + 6 L/h 3 HP 2 machines = 72 L/h.
(1) Relationship between main exhaust inside diameter and allowable discharge flow when using common exhaust (in case of vents)
|
PVC
|
Inner Diameter (mm)
|
Allowed flow [L/hr] | Notes | |
| Slope=1/50 | Slope=1/100 | |||
| PVC25 | 19 | 39 | 27 | Not suitable for main exhaust due to limited allowable flow |
| PVC32 | 27 | 70 | 50 | |
| PVC40 | 34 | 125 | 88 | Suitable for main exhaust |
| PVC50 | 44 | 247 | 175 | |
| PVC63 | 56 | 473 | 334 | |
**** Notes:
- The calculation assumes that the percentage of water in the pipe is 10%.
- Round the allowable flow to the nearest integer.
- The common water intake pipe of many machines should have a minimum inner diameter of 34 mm.
(2) Relationship between the inner diameter of the vertical exhaust pipe and the allowable discharge volume when using a common exhaust (in case of a vent)
| PVC | Inner Diameter (mm) | Allowed flow [L/hr] | Comments |
| PVC25 | 19 | 220 | Not suitable for main exhaust due to limited allowable flow |
| PVC32 | 27 | 410 | |
| PVC40 | 34 | 730 | Can be used for vertical exhaust in case of using common exhaust |
| PVC50 | 44 | 1440 | |
| PVC63 | 56 | 2760 | |
| PVC75 | 66 | 5710 | |
| PVC90 | 79 | 8280 |
**** Notes:
- Round the allowable traffic to a multiple of the nearest 10.
- The common vertical discharge pipe of many machines should have a minimum inner diameter of 34 mm.
Contact information P69 – M&E Contractor
Headquarter: No. 6/165C Xuan Thuy, Cau Giay District, Hanoi
Website: https://p69.com.vn/
Hotline: 02422121212 – 0965937799
Email: kd@cokhip69.com.vn
Facebook: https://www.facebook.com/p69nhathaucodien
LinkedIn: https://www.linkedin.com/in/congtyp69/
Youtube: https://www.youtube.com/channel/UCOUwCnE5iGj8iqe_ZIUM7oA

