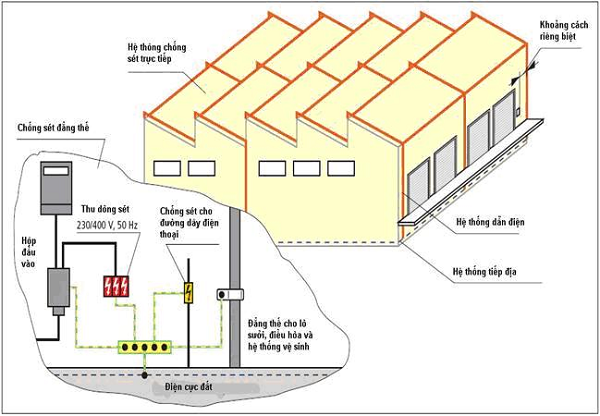
Every project needs to install electric ground to limit the danger and damage caused by lightning, electromagnetic induction, and electrostatic induction. Cause because lightning can cause danger, damage to people and property. So how to install the grounding yard? What are the standards and procedures? Please refer to the following article of P69 Joint Stock Company right now!
What is an electric grounding system?
A properly installed grounding system will provide the highest lightning protection efficiency. On the contrary, the grounding system will become a potential hazard to the installation itself and surrounding structures.

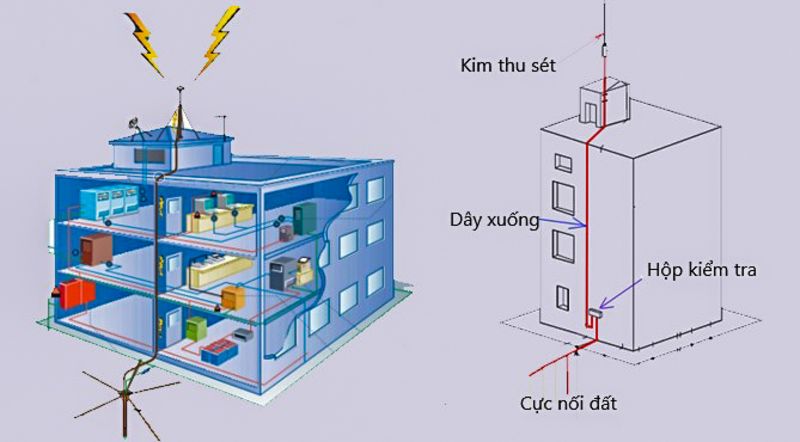
The grounding system includes:
- Ground rod
- Connection box
- Earthing wire
- Here is the connection to the electrical equipment
- Resistance-reducing chemicals
Materials to support the construction process such as:
- Heat chemical welding mold
- GOLDWELD thermochemical solder
- Quality resistance meter
Connected to each other through cables and in contact with earth. If this system is installed correctly, the technique will ensure the safety of people and structures to be protected, for a long time of use.
What is the structure of the electric grounding system?
A grounding system must have a complete set of components: grounding rods, bonding wires, bonding joints, grounding boxes and testing.
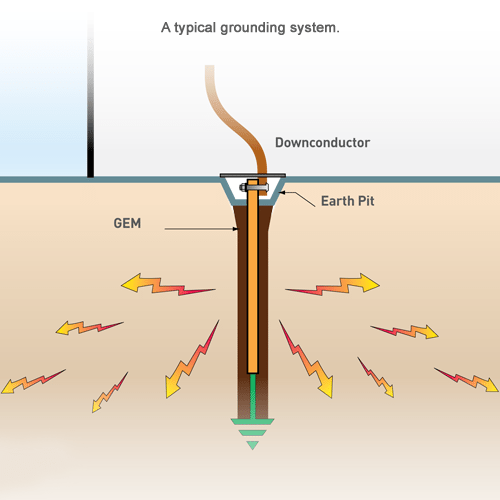
These parts all play an important role in helping the system operate efficiently. Besides, there is also a need for chemicals to reduce soil resistance, also known as materials to increase electrical conductivity of the soil. It helps to increase current dissipation. These chemicals have hygroscopic properties Then form a glue around the electrode to increase the contact surface between the soil and the electrode.

What is the standard for installation of a safe electric ground?
The grounding system needs to be properly installed to ensure safety. The system functions properly. Especially without affecting or damaging underground works (if any).
Depending on the current state of the soil, the location of the work, topographical characteristics, functional requirements, etc., the engineer will design and provide a reasonable and safe grounding method. However, all designs need to comply with the following standards:
- General requirements are specified in TCVN9358:2012, regulations on installation of grounding systems for industrial buildings.
- Regulations on lightning protection for construction works are specified in TCVN 9385:2012, guiding the design, inspection and maintenance of the system.
- General regulations on electrical equipment regulations are specified in 11 TCN-18:2016.
- Regulation on electrical equipment on electrical transmission system at 11 TCN-19:2016.
- The Regulations on Distribution Equipment and Substations are specified in 11 TCN-20:2016,
- Protection and Automation Regulations at 11 TCN-21:2016.

Lightning protection grounding system inspection procedure
Testing of the lightning protection grounding system is mandatory. The purpose is to ensure that the system performs its functions properly and well, ensuring maximum safety. Testing the grounding system helps to manage and use the system in buildings safely, minimizing related costs.
Step 1: Check and evaluate the suitability of the designs, as-built drawings of the electrode installation ground, diagrams of equipotential wiring, protective conductors, and design explanations. Material certificate verification, previous inspection reports.
Step 2: Check the grounding system parts hidden below the ground before backfilling. Then check the floating parts. Installation elements to check:
- Actual installation versus design
- Check the material usage according to the design requirements
- Are the welds and joints safe?
- Are anti-corrosion measures, circuit protection measures, measures against touch voltages and step voltages where required are up to standard?
- Check the underground parts in the soil
Step 3: Check measurement, continuity and check connection quality of protective ground wire, equipotential connection wire. Next measure the earth resistance, the resistance of the earth electrode, the total impedance of the loop to earth. Finally check the effect of excess current device.
Simple and easy to follow grounding installation instructions with only 5 steps
The grounding pile driving system is for projects with a lot of vacant land around, or for projects that have just started to build the foundation, we can drive piles under the foundation.
Step 1: Dig a ground trench.
– Determine the location for the grounding system. Check carefully before digging to avoid other underground structures such as underground cables or plumbing.
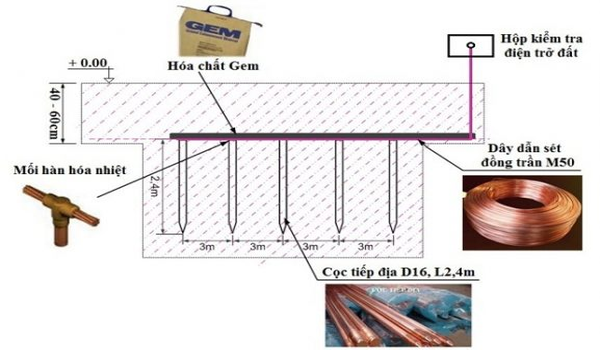
– Dig trenches from 600mm to 800mm deep, from 300mm to 500mm wide with length and shape according to design drawings or actual construction site.
– For places with limited construction ground or areas with high soil resistivity, the well drilling method must be applied, the borehole diameter is from 50mm to 80mm, and the depth is from 20m to 40m depending on the depth of the site. groundwater
Step 2: Bury the electrodes in the ground
– Drive the grounding pile at the specified places so that the distance between the piles is equal to twice the length of the pile to be driven into the ground. However, where there is a limited area for the soil system, it is possible to drive the piles with a shorter distance (but not less than 1 times the length of the pile).
– Drive the pile deep until the top of the pile is from 100mm to 150mm from the bottom of the trench.
– Particularly, the center earth pile is driven more shallowly than other piles, so that the top of the pile is 150 ~ 250mm from the ground so that when installing the ground resistance test pit, the top of the pile will be inside the hole.
– Spread bare copper cables along the dug trenches to connect with the driven piles.
– Pour chemicals to reduce soil resistance along bare copper cables or before driving piles, dig deep at the location of piles with pits with a diameter of 200mm to 300mm, 500mm deep from the bottom of the trench and chemicals will be poured into these holes. .
– Chemicals that reduce soil resistance will absorb moisture to form a glue that surrounds the electrode, increasing the contact surface between the electrode and the ground, helping to reduce the ground resistance and protect the grounding system.
– In case of well drilling, the grounding stake will be connected directly to the cable to drop deep to the bottom of the well.
– Pour chemicals to reduce soil resistance into the well, and at the same time pour water down so that all chemicals can settle down to the bottom of the well.
– EXOWELD (or LEEWELD) heat-welding to connect the piles to bare copper cables.
Step 3: Select and install the lightning rod
Lightning rods are made of metal with a length of 0.5-1.5m and are mounted on the roof. Connect the lightning rod to the metal wires going down to the ground. The lightning conductor is connected to the ground rod. The grounding part is metal rods about 2.5-3m long buried deep into the ground at a position 1-2m from the floor to the outside. You dig a trench 0.5m deep and connect the grounding pile ends together.
– The down-conductor directly from the lightning rod or the ground cable from the main earthing copper plate will be connected to the earth system at the location of the earth resistance test box.
Step 4: Return ground system ground
– Install the ground resistance test pit at the center pile position so that the surface of the pit is level with the ground.
– Final inspection of welds and cleaning of tools.
– Fill holes and trenches with soil, compact and return the ground.
– Measure the grounding resistance of the system, the allowable resistance value is < 10 Ohm, if it is greater than this value, it is necessary to drive more piles, process more chemicals to reduce soil resistance or drill wells to reduce the value. allow.
Lightning protection earthing system test cycle
The earthing system test cycle depends on where the system is installed. Inspection is required every six months for installations in particularly hazardous locations. Annual inspection of earthing systems installed in hazardous locations. Inspect every two years for earthing systems installed in less hazardous locations.

However, there is also a need for random checks. When it is necessary to immediately check if there is an accident, breakdown or danger of an accident. Or, after re-installing, repairing the grounding system, or repairing other nearby structures that may damage parts of the grounding system, it also needs re-inspection. In particular, after a natural disaster, storm, flood, earthquake, fire, it is necessary to check the equipment grounding system as quickly as possible.
Reputable electric grounding installation unit
Currently, there are many electric cable installation units on the market. However, we would like to introduce to you a reputable unit leading in the installation of electricity, light electricity. That is P69 Joint Stock Company. P69 is always appreciated by people for the following reasons:
– Factory-scale production, using modern equipment. International standard
– Professional and experienced team of engineers and technicians
– Free consultation and support 24/7
– Free shipping and installation
Contact us today for a free consultation and answer at:
Contact information P69 – M&E Contractor
Headquarter: No. 6/165C Xuan Thuy, Cau Giay District, Hanoi
Website: https://p69.com.vn/
Hotline: 02422121212 – 0965937799
Email: kd@cokhip69.com.vn
Facebook: https://www.facebook.com/p69nhathaucodien
LinkedIn: https://www.linkedin.com/in/congtyp69/
Youtube: https://www.youtube.com/channel/UCOUwCnE5iGj8iqe_ZIUM7oA

