We cannot deny the importance of toilet plumbing installation. The bathroom is the smallest space in the house. Yet it is the most important place in the family, anyone after stepping out of the toilet also feels comfortable after bathing.
The following article, P69 Company will help you answer questions about how to install a toilet drain pipe, through which you can go through the pipe in your home conveniently, quickly and neatly without any problems. Need a plumber to install electricity.
Regulations on how to go to the bathroom plumbing
The water supply and drainage system in the bathroom is divided into water supply pipes and drainage pipes. When installing, you need to keep a few things in mind:
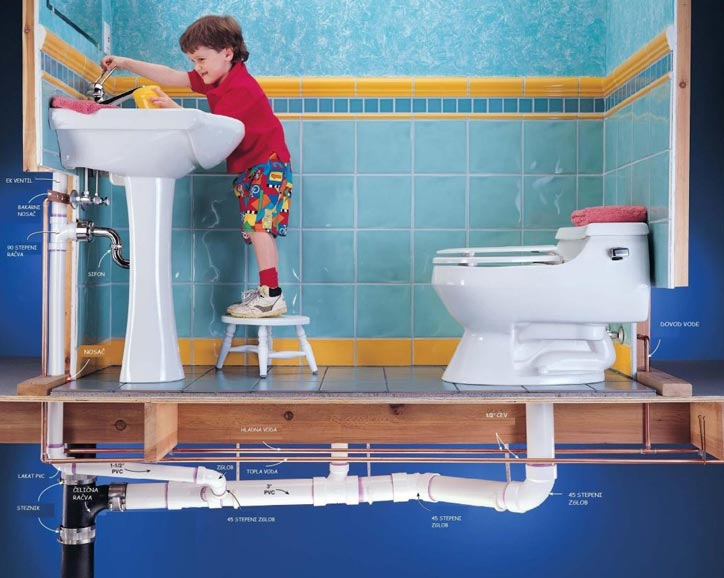
- About the drainage pipe: Always ensure that the drainage system is negative under the ground or under the bathroom floor, because then the waste water will have a slope to drain into the technical box.
- About the water supply pipe: Must adhere to the principle of mounting on the wall. During construction, the plumber will glue the negative water pipe into the wall, then fix it and close it to cover it.
In addition, when designing a bathroom plumbing diagram, you also need to keep in mind:
- The bathroom water pipe must be separate from the water supply and drainage system in the toilet
- (toilet, toilet) and drainage system (bathtub, lavabo, floor)
- Pipe length should be designed as short as possible
- The bathroom plumbing system must ensure that it does not go through the bedroom or living room
- Design and installation must ensure that they can be easily inspected, repaired and replaced when necessary.

Steps to design the installation diagram of the toilet drainage pipe
The design of the installation diagram of the toilet drainage pipe plays an important role for the installation, construction and repair. This pipeline design process has 4 steps as follows:
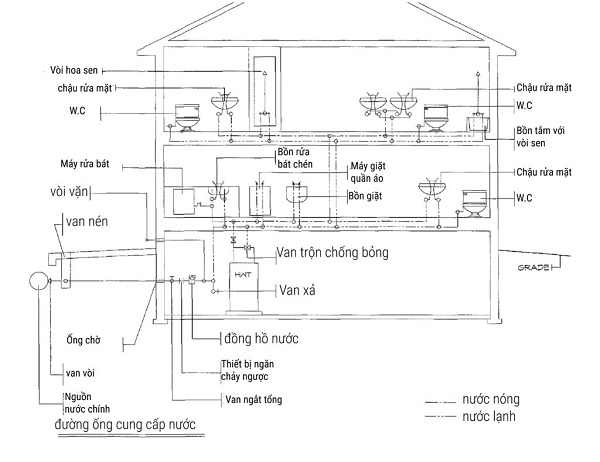
1. Make a diagram of the principle of water supply and drainage
The first thing is that we have to set up a diagram of the water supply and drainage principle. From this diagram you can know the principle of operation of the water supply and drainage system in the house. From there, you can identify many locations such as water supply pipes, drain pipes, pumps, ..
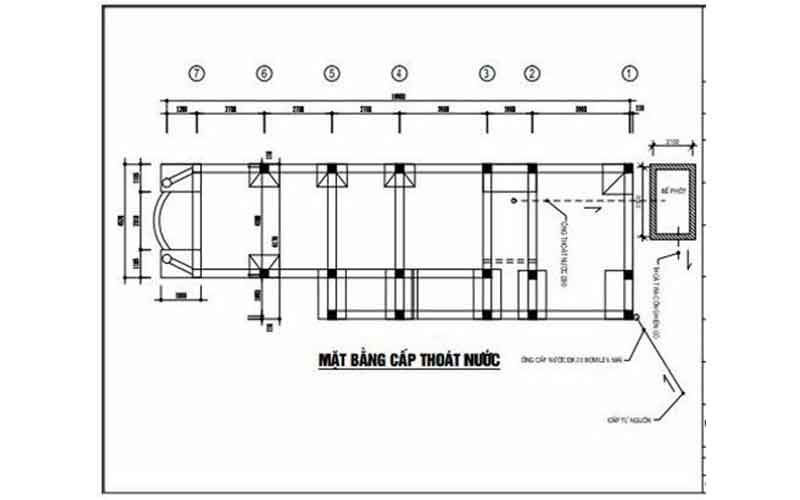
2. Design the floor plan of water supply and drainage
Once you have your schematic, you need to sketch out your ideas. When you design a floor plan, you need to properly arrange the following:
- Gene boxes contain.
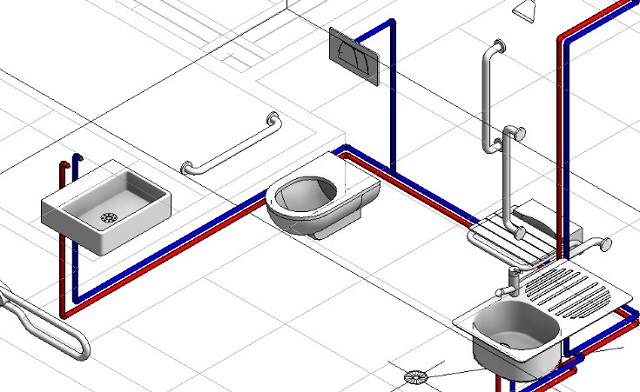
- Hot and cold water pipes
- Water supply and drainage pipes.
To be reasonable, save space and aesthetics of the house.
Note: Consider the installation location of the pump, water meter or septic tank, etc. Because these items are regularly checked, maintained and serviced.
Therefore, you need to install them in a convenient place for easier inspection, maintenance and servicing. From this indoor diagram, you can apply the design of the toilet plumbing installation plan.

3. Deploy detailed installation diagram
After designing the ground, we need to develop detailed drawings of water supply and drainage. In this step, you need to determine the exact locations of the pipes as well as the equipment that you need to install. You should design details on both the plan and the cross section of the blueprint to make the construction more convenient.
4. Installation of water pipes
In this final step, you just install according to the pre-built design. The rough part of the house will be installed first and then proceed to the installation of materials. This type of installation will help workers avoid chipping and still construct easily. Make sure the house after completion is on schedule and aesthetically pleasing.
Components of a plumbing diagram
A most detailed and specific water system includes the following details:
- There is a main sewer line
- There is a door to visit
- There is ventilation
- Drain pipe, horizontal pipe, vertical drainage pipe.
- Water trap helps prevent odors
- Necessary sanitary equipment
Refer to the toilet plumbing installation diagram
Water supply and drainage drawing is simply understood as a drawing that provides the most overview of the toilet water supply and drainage system. This water supply and drainage drawing provides a detailed way of the water system so that when something goes wrong it can be easily repaired. You can refer to the diagram of the water supply and drainage system in the toilet.
-
- Quantity of materials.
- Surface water supply and drainage.
- Detailed toilet water supply and drainage diagram.
- Water supply and drainage devices.
Here is a diagram of the standard toilet drain pipe installation of a family that you can refer to:

Rules for installing standard toilet drain pipes
Rules for installing toilet drainage pipes include the following principles:
1. Drain pipe installation location
- The toilet drain pipe is 15cm – 20cm high from the floor, the center of the drain pipe is from 30 – 32cm away from the unplastered wall depending on the type of toilet
- The floor drain system should be designed in the innermost corner of the bathroom, the center of the floor drain is 15x15cm from the wall
- The lavabo drain pipe is punched straight under the floor to the center of the outlet hole, about 60cm from the tiled floor
- The size of the bathtub drain and the freestanding tub must be based on the size of the tub used by the homeowner to arrange the drain pipe.
2. Standards on arrangement of water supply pipes
Normally, when the supply water flows from the top down to meet the equipment, the pipe will run horizontally. The horizontal water supply pipe will retract starting from the main supply shaft. At the terminal waiting for the device to use hot and cold water, the installation principle is as follows:
In order to match the design of bathroom equipment (hot and cold water tank, solar tank,…) hot water supply pipe is usually arranged on the left, cold water supply pipe is installed on the right.
Water supply will go from the top down through the water heater, the pipe runs horizontally about 75cm from the ground. Divide into 2 branches.
- Branch 1, turn left 50cm, run down 20cm will be the faucet, then 30cm across is to the shower and 70cm away is the washbasin.
- Branch 2 goes from the hot and cold water tank down to the bathroom floor 15cm, turn right 1m away is the toilet.

3. Standard bathroom pipe diameter
When designing bathroom water pipes, you also need to pay attention to the standard size of pipes that will be used to ensure the best water supply and drainage efficiency:
- The main drain pipe must have a diameter of >20mm
- Vertical drain (main vertical pipe) must be >78mm
- Horizontal pipes (horizontal pipes) not inclined more than 45 degrees and diameter > 38mm
- Pipes for bathtubs and washbasins must be >38mm
- Minimum diameter of water supply pipe must be >20mm
- For high-rise buildings (7 – 10 floors) there will be large water pressure, so the branch water supply pipes can use an additional 20mm pipe.
- The standard diameter of the vent pipe is 34mm .
- The standard size hood is 90mm
Contact us today for a free consultation and answer at:
Contact information P69 – M&E Contractor
Address: No. 6/165C Xuan Thuy, Cau Giay District, Hanoi
Website: https://p69.com.vn/
Hotline: 02437688156 – 0965937799
Email: kd@cokhip69.com.vn
Facebook: https://www.facebook.com/p69nhathaucodien
LinkedIn: https://www.linkedin.com/in/congtyp69/
Youtube : https://www.youtube.com/channel/UCOUwCnE5iGj8iqe_ZIUM7oA

