When designing straight-line lightning protection using a lightning rod, an early discharge lightning arrester (lead ray) is not only based on theory, the designer needs to take into account the actual geological factors at the construction site to come up with a solution. decisions on the safe and effective installation of lightning protection systems. Here are some shared experiences on how to install air-termination needles according to technical standards, as well as notes when installing Early Streamer Emission.
Early Streamer Emission ground structure
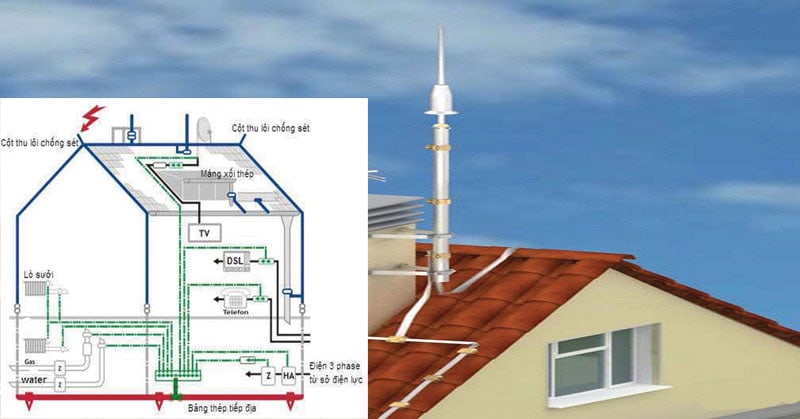
A modern, complete lightning protection system will include:
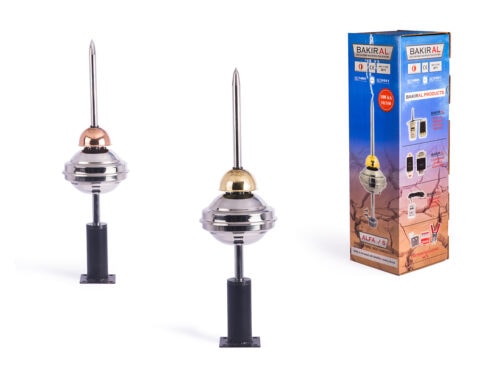
- Active Early Streamer Emission installed for residential houses (Normal radius < 60m)
- Lightning conductor (M50mm2 copper cable, or M70mm2 copper cable with yellow-green fireproof sheath)
- Lightning poles (Usually 3-5m high depending on the height and width of the building to be protected
- Grounding test cabinet (For annual periodic testing)
- Ground rod (Copper or copper-plated steel, size D16 2.4m long)
- Thermochemical weld (Or copper grounding clamp)
- Complete installation accessories (Including all installation accessories, you do not need to buy anything to complete the installation).

Early Streamer Emission roles
Lightning protection systems are intended to solve and overcome natural disasters to ensure the safety of people, buildings and constructions as well as most other structures that may be affected by lightning.
How to install lightning protection grounding system
The lightning conductor grounding system helps to prevent the lightning’s energy from directly affecting the structure to be protected. As a result, the project is fully protected. Immediately follow the ways to install the lightning protection grounding system below
Step 1: First, you must dig a trench, a hole or drill a grounding well.
First, you need to determine where to install the grounding system. Around the installation area, there may be underground structures, obstacles or water systems, etc. Therefore, it is necessary to carefully check to avoid these works before digging.
Next, you dig a trench with a width of about 30cm – 50cm, and a depth of about 60cm – 80cm. Shape and length will follow the design drawing. Or it can also be adjusted according to the actual construction site.
Note, in practice, there will be areas with high soil resistivity or limited construction sites. At this point, you need to apply the good drilling method to ensure safety. Drilling wells with a depth of 20m to 40m are reasonable. The diameter will be from 5cm – 8cm depending on the depth of the groundwater.
Step 2: Next is to bury the electrodes in the ground.
- How to drive grounding stakes when installing lightning rods
Ground rods need to be driven according to the design, at specified places. The distance between the stakes will be twice as long as the length of the stakes driven into the ground. Spacing between piles may be shorter in areas with limited soil system area. However, the distance should not be shorter than the pile length.
Drive the grounding stake deep into the ground. When the top of the pile is 10cm – 15cm from the bottom of the trench, stop.
Pile the central soil shallower. The top of the pile is from 15cm to 25cm above the ground. So that the top of the pile is inside the pit after installing the earth resistance test pit.
Then it is necessary to connect the piles by spreading bare copper cables along the dug trench.
- How to use resistance-reducing chemicals when installing Early Streamer Emission
An equally important step is to pour the earth resistance-reducing chemical. This chemical will absorb moisture. It then forms a glue around the electrode. This helps to reduce the earth’s resistance by increasing the contact surface between the electrode and the earth, protecting the grounding system. Resistance-reducing chemicals can be poured before piling or along with bare copper cables.
If pouring before piling, at the location of the pile, it is necessary to dig a hole 50cm deep. Diameter from 20cm – 30cm from the bottom of the trench. Then pour soil resistance-reducing chemicals into these pits.
If drilling a well is carried out, the ground rods are connected directly to the cable, then dropped to the bottom of the well. Sprinkle chemicals to reduce soil resistance into the well, pour water down at the same time so that the chemical settles deep to the bottom of the well.
Heat-welded to bond the piles to bare copper cables.

Step 3: Instructions for installing the column and the base of the Early Streamer Emission support
Poles and poles supporting lightning rods need to know how to install them carefully and properly to ensure the safety of the whole earthing system.
The lightning conductor of the first ray needs to be placed at the highest position on the building. Columns for attaching lightning rods should choose stainless steel columns with a diameter of 42 and a length of 3m. The pole is connected to the anchor rope, on the pole, the nut is in 3 positions. To prevent damage from storm winds, the lightning rod should be firmly reinforced with the pole.
Step 4: Installation instructions for lightning cable (lightning cable)
The number of lightning conductors will depend on the size of the project. Lightning conductors must have a cross section from 5cm to 7cm.
For projects with a scale of less than 60m2, a lightning conductor with a cross section of 5cm – 7cm can be used. For buildings with an area of 60m2 or more, at least 2 lightning cables should be used.
The lightning cable is pulled from the base of the lightning pole to the ground and should choose the shortest and straightest path to run the cable. Note that it is recommended to use a belt to fix the cable once every 1.5m. When conducting cables, avoid items such as antennas, water tanks, etc. And must ensure to conduct lightning current to ground safely and quickly.
Step 5: Return ground system ground
In the central pile position, it is necessary to install a ground resistance test pit so that the resistance value is less than 10 Ohm. If this value is larger, it must be treated with chemicals to reduce soil resistance, drive more piles or drill wells to reduce to the allowable resistance value.
Finally, fill with soil and compactly into the trenches, pits and return the ground.
How to choose and install lightning rods
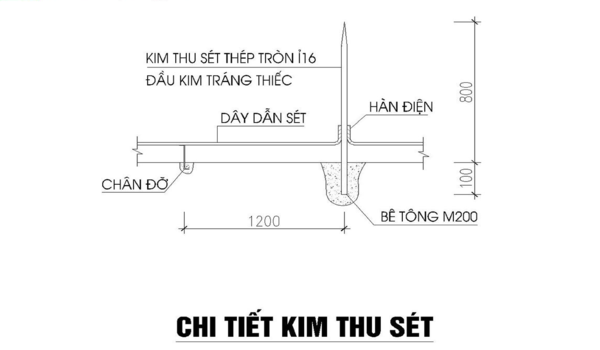
The lightning rod is mounted on the roof of the building, the highest place of that building. Needles have a length of about 50 – 150cm, made from metal. The lightning conductor is connected to the metal wire to the ground. The lightning conductor will be connected to the grounding pole. The grounding part is metal rods that are driven deep into the ground, with a length of about 250-300cm.
The grounding unit is installed at a position 1-2m away from the house outside. Dig a trench about 50cm deep, connect the grounding pile ends together. At the location of the earth resistance test box, the down-conductor from the lightning rod or the ground cable from the main earthing copper plate will be connected to the earth system.
What are the notes to know when installing lightning rods?
The things you need in the installation of lightning rods include:
Note about the protection area – choose a reasonable lightning rod
Use IEC standard 21186 – 96 or NFC 17 – 102 France in combination with current Vietnamese standards for calculation. It is necessary to calculate all levels of protection radius: Level 1- Level 1, Level 2 – Level 2, Level 3 – Level 3, Level 4 – level 4. To do so, it is necessary to consider the height and location of the work and architecture. Attention should be paid to the selection of the height and location of the lightning rod installation.
In addition, to ensure the safety of the work, it is necessary to consider the air gap between the needle column and neighboring objects or the minimum height of the needle column.

Structural works related to ESE system
If the frame and roof that are in contact with the lightning protection system are iron corrugated iron, then you should consult more about the use of the building. From there to decide whether lightning protection system with construction or insulation.
Designers also need to pay attention to the location of conductive objects such as antennas, water tanks, roof water pipes, etc. These devices are often affected or damaged when lightning strikes in the vicinity.
In addition, if the design is not guaranteed, these items can also become electrical conductors into the work and cause danger to people and property.
Conductor used for lightning discharge
The larger the lightning conductor, the better, so it is less likely to be connected and choose the shortest and straightest route possible. It is recommended to use conductors with good electrical conductivity, usually round copper wire braided, the wire should have a cross-section of 50mm2 or more.
Lightning protection grounding system
The lightning protection grounding system needs to have a small impedance and be stable for many years to ensure the safe and fast dissipation of lightning energy to the ground. The lightning cable, grounding system and lightning rod must be synchronized with each other. Depending on the terrain, the appropriate number and type of piles shall be arranged. Equipotential grounded systems are close together by Equipotential Valves.
Using lightning rods for construction is essential. Especially for places that often have to receive heavy rain accompanied by thunder like Vietnam.
Reputable Early Streamer Emission installation unit
Currently, on the market, there are countless units that install lightning rods. However, we would like to introduce to you a leading reputable unit in electrical installation, light electricity. It was P69 Joint Stock Company. P69 Joint Stock Company. Our company is always appreciated by people for the following reasons:
– Factory scale, using modern equipment. International standard.
– Professional and experienced team of engineers and technicians
– 24/7 free support consultation
– Free shipping and installation
Contact us today for a free consultation and answer at:
Contact information P69 – M&E Contractor
Headquarter: No. 6/165C Xuan Thuy, Cau Giay District, Hanoi
Website: https://p69.com.vn/
Hotline: 02422121212 – 0965937799
Email: kd@cokhip69.com.vn
Facebook: https://www.facebook.com/p69nhathaucodien
LinkedIn: https://www.linkedin.com/in/congtyp69/
Youtube: https://www.youtube.com/channel/UCOUwCnE5iGj8iqe_ZIUM7oA

