Before we want to build a project such as a school, office, company, etc., we need to go through the design and implementation of electricity and water construction. Therefore, this is an extremely important step that cannot be missed when you want to implement a project. In today’s article, P69 company will introduce to you the electrical and water construction techniques in standard civil works that you may be interested in.
Why should the correct technique be followed when constructing electricity and water in the project?
Many people believe that in the construction, only electricity and running water are enough. It is not necessary to care about the correct installation technique. This is a completely wrong concept because the risk with the project is extremely large. This can even be life-threatening. In fact, in Vietnam, there have been many fatal electric shock leaks, which are directly caused by improper installation of electrical systems that are not safe.

You must have experienced a clogged drain. In the course of more than 10 years of construction and maintenance of the water and electricity system, we found that 90% of the causes of clogged pipes are installation errors. Only 10% errors due to the use process only.
Therefore, the correct implementation of electrical and water construction techniques is a mandatory requirement to avoid unwanted problems later in the process of use.
Principles to keep in mind when constructing electricity and water in civil works
– Use a low voltage tester or a light bulb to determine the current. It is strictly forbidden to use hands to test, which will cause danger to the user.
– In case of broken electricity located above the galvanometer, the electricity branch must be notified to send workers to repair. If the damaged part is behind the galvanometer, it is imperative to cut the main circuit breaker before proceeding to repair the damage.
– It is necessary to ensure that the distance between 2 porcelain clamps or 2 adjacent porcelain pulleys is not too large, besides make sure the distance between the conductor and the structure is not less than 10 mm.
– Construction of electrical conductor connection needs to be staggered and has insulation tape wrapped outside the connection, especially for the case of double wire.
– Never close or cut circuit breakers, switches, etc. When your hands are still wet, it will transmit electricity, causing people to be electrocuted.
– Only electrical equipment and electrical tools that have been grounded and connected without safety protection are allowed.
– Construction and installation of circuit breakers, electrical switches on small wooden boards, and fasten them to walls or columns. The most reasonable place to mount the wooden board is about 1.5 m above the ground. Pay attention to the circuit breaker, the electrical switch must have a safety cover.
– The main lines in the house and each auxiliary line or electrical appliances in the house must have a protective fuse with a safety cover. The fuse-link of the protective fuse must be suitable for the use capacity to ensure that when there is a short-circuit, the fuse-link must explode and cut the circuit. The fuse-link must be installed according to the technical requirements. In a single-phase circuit, it is mandatory to put a fuse on the hot wire. If both wires are hot wires (2 phase wires), you must put fuses on both wires.
– The electrical conductors in the house must not use bare conductors but must use insulated conductors of reputable quality. It is necessary to select the electrical conductor cross-section in accordance with the ability to carry current to the power tools that it provides, to avoid the case of using a conductor with a small cross-section on power tools with too large capacity to avoid causing damage. serious electrical problems.
– When conducting indoor wiring installation, it is necessary to place it on clamps, porcelain pulleys or electrical conduit, which is usually made of plastic.
– Make sure that the electrical wires through the walls and roof need to be placed in protective porcelain pipes. Avoid rain water standing in pipes or running down the house. The distance from the insulators supporting the end of the electrical conductor entering the house to the roof needs to be 2m or more.
– The installation location of circuit breakers and switches must be easy to disassemble, there are obstacles below, the place must be spacious and well-ventilated, ensuring that the closing and cutting of electricity is quick and timely.
– Avoid installing electrical outlets, electrical switches, do not pull power cords through wet places, toilets or bathrooms. For the bathroom, the safest place to place the power switch is on the outside of the room door, next to the door frame on the side without hinges.
– In case the circuit breaker, switch, and electrical outlet is damaged, it must be installed new or replaced immediately to ensure safety for human health.
– It is especially necessary to educate children to understand and not to put metal wires, iron nails or put fingers into electrical sockets.
Electrical construction process in civil works
Let’s find out the process and methods of construction of electromechanical systems for offices and families first. In this section, we will go into depth and focus on the construction of electricity and water. In the electrical part, the construction team will proceed step by step in the following order:
Step 1: Install the power line protection pipe system
During the installation of the power line protection system, you should pay attention to strictly follow the agreed standards and design guidelines.
In the current designs, architects often follow Vietnamese standards, IEC standards. This protective tube shall be flexible, high temperature resistant, impact resistant and readily malleable.
Usually, we put wall pipes and concrete floors. In areas of technical floors, pipes run floating on technical floors. The installation process is as follows:
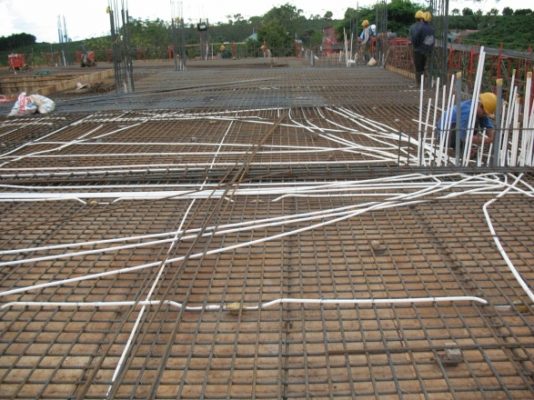
– The pipe system placed in the concrete floor is implemented right after the construction unit finishes weaving the floor iron layer: In places where there is only one layer of floor iron, the pipe will be placed right on the iron layer, in a position with two layers. iron floor, pipe will be placed between two layers of iron floor. At the turns, these pipes will be bent by springs, the radius is about 6 to 9 times the pipe diameter, ensuring that we can easily pull the wire and replace it later if something goes wrong.
– Absolutely do not use the connectors at the turns: because it will directly affect the pulling of the rope due to the sharp turn. At splits of 3 or more wire branches should be made in boxes.
– The pipes waiting for the wire to be pulled must be covered: to avoid foreign objects entering and having difficulty in pulling the rope later.
Note:
- When installing underground pipes: it is recommended to install and repair the wall when building the wall 5 days, so that the wall is sufficiently rigid, not cracked when punching the wall, and should only be chiseled after cutting the wall. In places where pipe cutting and splicing is required, the cutter head should be smoothed to avoid scratching the wire. The distance between the two joints is >50mm compared to the middle of the pipe and >25mm at the end of the pipe. Should be fixed by cement or concrete after being fixed by horizontal steel bar or steel wire column.
- Pipes floating on technical floors, in technical boxes: must be fixed by hose clamps and the distance between clamps should be >1200mm. Drill the screws and spacers to attach the hose clamp with an electric drill.
- Standard for underground electrical conduit: the pipe going in the wall should go in parallel, with the last part being a box containing switches and sockets. Fix the tube to the box with a screw coupling, the recessed light box in the floor needs to be stuffed with paper, foam and covered with masking tape, to prevent the mortar from entering. The connection pipe must be >7mm from the formwork, to avoid cracking bare crow’s feet.
- Use the water scale to determine the position and elevation for the light box, switch box: make sure the boxes after installation are not tilted or skewed.

Step 2: Install the power cable
Immediately after completing the installation of the pipe system and junction box, the next step is to install the cable. This stage is very important, so it should be done carefully with a team of skilled workers to ensure that the wiring is simple to install, easy to repair and replace. Otherwise, the repair later will be extremely difficult and complicated.
Besides, you also need to note a few details:
- The number of wires should only be < 40% of the pipe cross section: This makes it easier to replace later. The wires should be distributed in the right area, in the correct color scheme in the design.
- Install wires in the correct order and position in the diagram of electrical distribution cabinets: Connections should be made in plug boxes or light tray boxes. No wiring in the conduit, avoiding electrical problems such as short circuits, and making it easy to repair or replace.
- Standard connector cable: has a diameter suitable to the wire cross-section, the power cable connects to the equipment. These connections must ensure the insulation of the whole system, do not overlap on the cross-sections, the distance of the wires is reasonable, do not cause entanglement, the insulation resistance must meet the requirements according to TCVN.
- Cable lines must be sure: underground cables must have a minimum depth of 800mm, threaded in PVC pipes with protected concrete, the density of wires in pipes and troughs must be <40% for good heat dissipation and not affected. affected by the traffic above.
Step 3: Install electrical cabinets and panels
Electrical cabinets and panels are usually cabinets with pedestals and can be mounted on the wall. The installation of these cabinets and panels must be coordinated with the construction work, right before the completion of the wall, because at this time we can determine the position of the iron bars and switches to install the cabinets.
- Fix the nameplates of the branches coming out of the cabinet: for easy inspection and maintenance later.
- The equipment inside the cabinet: must be installed by a team of skilled workers. Dimensions and details of the equipment inside will be handed over to the investor in the drawings for them to carry out production and installation as well as to consult and supervise the construction later. The cabinet will be designed and installed in accordance with regulations and meet IEC standards.
- Time to install cabinets: right after finishing the first coat of water paint.
- Ground wire: is spread from the position of the distribution cabinet to the grounding pole. The grounding pile system is installed right after the ground leveling is completed, meeting the resistance measurements specified in the design and regulations.
- Use cable reinforcement for connection: after the cabinet and the electrical panel are put into the connection position between the ground wire and the grounded busbar.
Step 4: Install electrical equipment
Devices that use electricity here include:
- Wiring, ap-to-mat, switch: must ensure the right quality and type required in the design and according to the requirements of the investor.
- Lights, switches, sockets: are installed after pulling the wire and the paintwork has been completed.
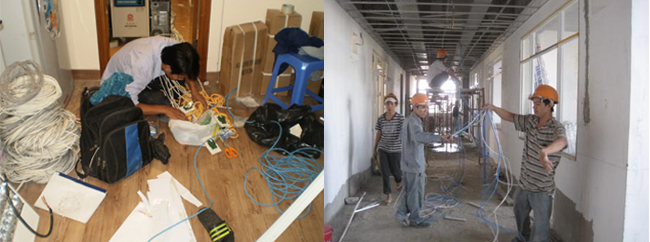
- A team of technicians is installing electrical equipment
- Technician is installing electrical equipment
- Wiring system and electrical equipment: installation principles comply with technical regulations, regularly check and compare with design drawings to coordinate on schedule with construction.
- Location of electrical boxes, waiting boxes: must be installed correctly in both position and height, in the right route and must have certainty. The terminals of the waiting line must have a distinguishing mark to avoid confusion.
- Conduct electrical testing, and system operation: as soon as all electrical equipment is installed, if not satisfactory, check and correct it in time before handing over to put into use.
Step 5: Perform connector work, check
The work of connection, inspection and acceptance needs to be done by a team of skilled workers with high technical level. Some points to pay attention to carefully carry out the acceptance test:
- Cable terminations are terminated: right before installation in the connection point of the equipment, the cable ends must be terminated, except for the case of connection point structure at the equipment with small capacity.
- Before making connection: must carefully check the connection diagram, the voltage used of the equipment described in the catalog or on the label.
- Attach device codes: for junction boxes, lights, fans, air conditioners, light rods, light poles, etc., to facilitate later inspection and maintenance.
After having in hand the drawing of construction methods for the water supply pipe, we will proceed to other tasks in sequence such as:
Step 1: Construction of the refrigeration system
- Refrigerant pipes going underground or floating: must be insulated with thickness >19mm for steam pipes and >6mm for liquid pipes.
- Installation time: right after building the wall 5 days is reasonable.
- PVC condensate drain pipe: must be insulated with thickness >13mm, slope 1%.
- Openings through floors or walls: must be sealed with waterproof material
- Pressure testing of the liquid pipeline: must be carried out carefully before gas is injected. Gas must be pressure tested according to the manufacturer’s standards.
Step 2: Construction of communication and fire alarm system
- Construction at the same time: hidden underground pipeline system for fire notification and hidden underground pipe system.
- Installation standards: communication cables must be placed in troughs, separate pipes from medium/low voltage cables with a distance of >0.6m
- Connection of communication and fire alarm cables: must be placed in the junction box, and connected by means of connections.
- Ground in a single location: with all levels covered.
- Installation height: with network socket, fire alarm device according to instructions and meets TCVN.

Step 3: Construction of lightning protection system
- Implementation sequence: lightning rod F16, h=0.5m and grounding pile l63x63x5, l=2.5m driven into the ground by hammer, connected between 30×4 steel plate and grounded piles buried about 0.8m and down-conductor F16, air-termination wire F10, connected to the ground wire from the ground to the roof.
- Installation standards: the air-termination wire is placed >8cm from the wire laying surface, connected to the roof frame, wall by turn-on pins, the distance between the turn-on pins is >1m. The F10 lightning conductor is placed on the wall, the column is also fixed with the flip-flops as above.
- Lightning conductors and lightning conductors must be painted with anti-rust paint: the ground wire, the grounding pile must be absolutely unpainted.
Measures to ensure safety during construction
– Electrical equipment such as Aptomat, circuit breaker, switch must be placed in a convenient and safe place to use, with sealed box and signs.
– Electrical equipment and machinery must be grounded for safety and protected against circuit and overload.
– Only electrical workers who have undergone safety training can do electrical work.
– Strictly comply with technical regulations on safety in construction (TCVN 5308-91) with sufficient force and means of fire prevention and fighting.
Quotation for electricity and water construction according to m2:
Are you having water problems? Affect your daily life but you do not have enough expertise and knowledge to repair. Please contact our company immediately for support to solve the problem. Here are the repair prices you can refer to:
1. Quotation for office electricity and water construction
In the case of offices, it is usually electrical construction. In order to be able to quote the most accurate price, our company will send someone to survey the current site or technical drawings. The construction cost of the office’s electrical items will depend on the needs and complexity:
– For the construction of floating electricity, the price will range from 90,000 VND to 150,000 VND/m2.
– For construction for wall and ceiling electricity, the price will range from 120,000 VND to 150,000 VND.
2. Quotation for construction of electricity and water at home
– Townhouse: 90,000m2.
– Villa: 120,000m2.
Normally, for electricity and water construction, the quotation for electricity and water construction will only include construction labor. For the design, it will depend on the needs of the customer to choose the appropriate equipment.
The technical parameters will be provided to you by the construction unit for installation. The construction unit can advise you basically on the most necessary features. For our company, we will give you dedicated and in-depth advice on technical drawings.
The design and construction of electricity and water are extremely important to maintain daily life, which is an impossible element in our modern life today for all homes.
For equipment that goes underground, you need to check and maintain it regularly because repairing underground passages is very difficult and complicated. So please contact our company immediately to help you fix this problem.
Contact us today for a free consultation and answer at:
Contact information P69 – M&E . M&E Contractor
Address: No. 6/165C Xuan Thuy, Cau Giay District, Hanoi
Website: https://p69.com.vn/
Hotline: 02437688156 – 0965937799
Email: kd@cokhip69.com.vn
Facebook: https://www.facebook.com/p69nhathaucodien
LinkedIn: https://www.linkedin.com/in/congtyp69/
Youtube : https://www.youtube.com/channel/UCOUwCnE5iGj8iqe_ZIUM7oA

