After completing the install of the gas pipeline system (the end of the pipe has been sealed at eh indoor unit), conduct a pressure test of the air-conditioning gas pipe system in the floor of the contractor allows the ceiling to be closed. Carry out the construction of the claim gas pipeline to the out door if the conditions permit. Try applying pressure again when you have caught all the zacco of the indoor unit and connected all the gas pipes to the outdoor unit. In order for the pressure test process of the air conditioning gas pipe system to take place successfully. Please refer to the following article with P69!
Notes when pressure testing the air conditioning gas pipe line system
- Be sure to vacuum the tube before checking for air tightness
- Nitrogen gas should always be used for pressure testing .
- The pressure of the pressure test method is the design pressure for the air conditioner.
Pressure test procedure for air conditioning gas pipe system
1. Check the electrical system
- If the unit has many indoor units, it is difficult to check. Check the probability of some machines to see if the wiring is correct. (The most important thing is that the power cord of the indoor unit must be connected correctly)→ Then check the interlock wire be measuring the continuity form the last indoor unit (The indoor unit has a wire F1,F2) to the wire F1,F2 connected to the outdoor unit. If the circuit is open , procced to the next steps
- Check the voltage of the indoor unit 220-235V (closer to 220V is best)
- Check the voltage of the cable to the outdoor 380-400V (closer to 380V is best).
- Check the gas piping system.
2. Vacuum cold pipe
Connect the commutator gauge to the service port of the liquid and gas hoses. Run the vacuum pump for approximately 30 minutes, although pump run times may vary depending on the respective pipe length.
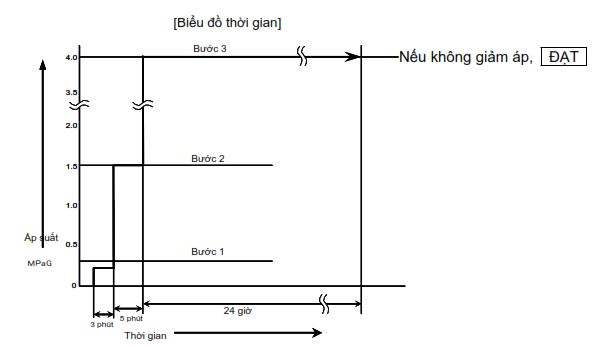
3. High pressure nitrogen pump
Compress the high-pressure nitrogen gas for the liquid and gas pipes of each chiller piping system by following these steps:
- Step 1: Inflate gas at 0.3 MPaG for at least 3 minutes (Allows large leak to be detected)
- Step 2: Inflate gas at 1.5 MPaG for at least 5 minutes (Allows large leak to be detected)
- Step 3: Pump gas at 4.0 MPaG for at least 24 hour (Allows large leak to be detected)

Note: Even when pumping gas at 4.0 MPaG, the short time will not allows small leaks to be detected. instep 3, be sure to inflate for 24 hours. And especially do not pump gas at a pressure higher than 4.0 MPaG.
4. Check for pressure drop
If there is no pressure drop, the pressure test is completed. The change in the outside temperature between the gas injection and the depressurization test will result in a correction for the pressure measured at the depressurization test because the pressure will change by about 0.01 MPaG for every 1C.
Corrected value = (Pump temperature – Test temperature) x 0.01 MPaG
For example:

In this case, the correction will be 0.05 MPaG, so you can determine that there is no pressure drop (indicating a PASS).
5. Leakage test when pressure test
If a pressure drop is found, find the leak by applying soapy water to the pipe surface at the connections (flare joints, welds) and load the drain hose connection. In fact, if a pressure drop is detected, it will take a long time to locate the leak .
Pressure testing should not be performed everywhere form the indoor unit to the outdoor unit at the same time . An effective method for checking is to the work schedule. After conducting the pressure test, keep the pressure in the tube between 0.2 and 0.3. MPaG to avoid contamination of the tube.
Work can be carried out efficiently if the test unit assembly is prepared in advance.
Contact information P69 – M&E Contractor
Address: No. 6/165C Xuan Thuy, Cau Giay District, Hanoi
Website: https://p69.com.vn/
Hotline : 02422121212 – 0965937799
Email: kd@cokhip69.com.vn
Facebook: https://www.facebook.com/p69nhathaucodien
LinkedIn: https://www.linkedin.com/in/congtyp69/
Youtube : https://www.youtube.com/channel/UCOUwCnE5iGj8iqe_ZIUM7oA

